
Shotcrete Repair to Correct Out‑of‑Level Bond Beams Prior To New Coping
Uneven swimming pool bond beams are quiet instigators. You see them when coping rocks to and fro, waterline floor tile strays backwards and forwards, or that "white line" at the plaster edge declines to rest degree. If you attempt to conceal it with thick mortar beds or creative cement lazy river installation joints, the swimming pool always tells on you later.
Correcting an out‑of‑level pool bond beam of light with shotcrete or pneumatically used concrete before setting new coping is one of those work that divides aesthetic work from true restoration. Done appropriately, it provides you a straight, strong foundation for every little thing over the waterline: dealing stones, bullnose block, glass mosaic floor tile, even the eventual Quartz accumulation finish or Exposed pebble finish.
This is a technical process, yet it is not mysterious. It is series, judgment, and discipline.
Why the bond beam of light matters so much
The swimming pool bond light beam is the architectural ring on top of the swimming pool shell. It connects the walls with each other, supports the deck user interface, and lugs the lots of the coping and the leading side of the interior finish.
When the bond beam runs out degree or out of plane, numerous things start to turn up:
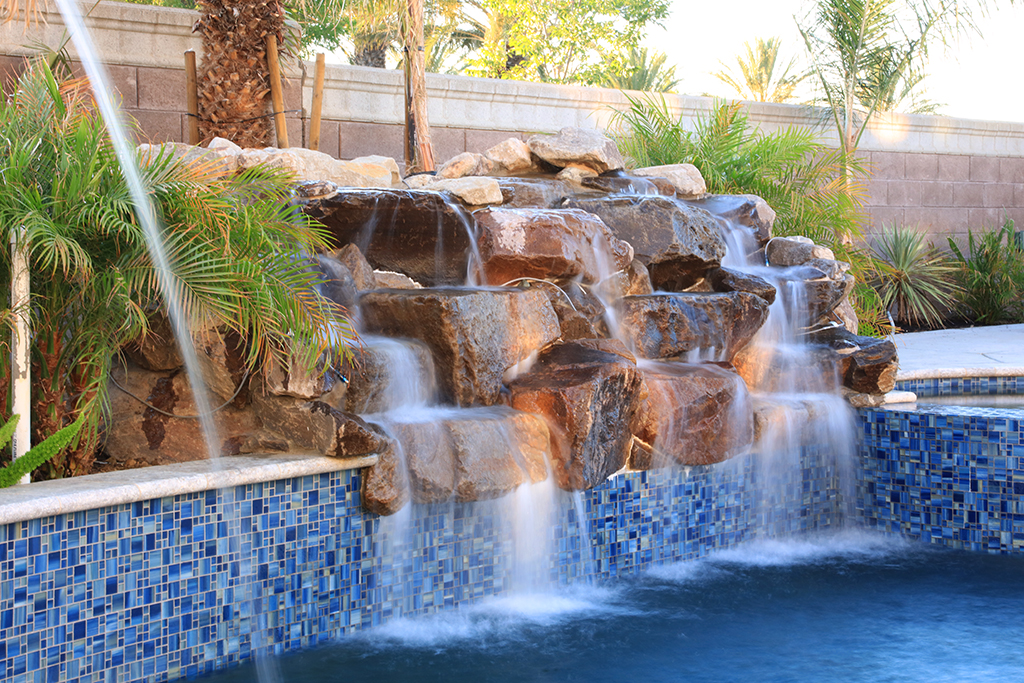
Waterline floor tile resembles it is climbing or dipping, particularly when you use Glass mosaic floor tile that shows every millimeter of change.
Coping joints open or rock because installers are fighting differing mortar thicknesses.
Mastic joints at the back of coping fall short early, and Mastic joint substitute ends up being a recurring service call.
The notorious White line plaster at the floor tile user interface appears thicker on one side of the swimming pool, thinner or practically missing on the other.
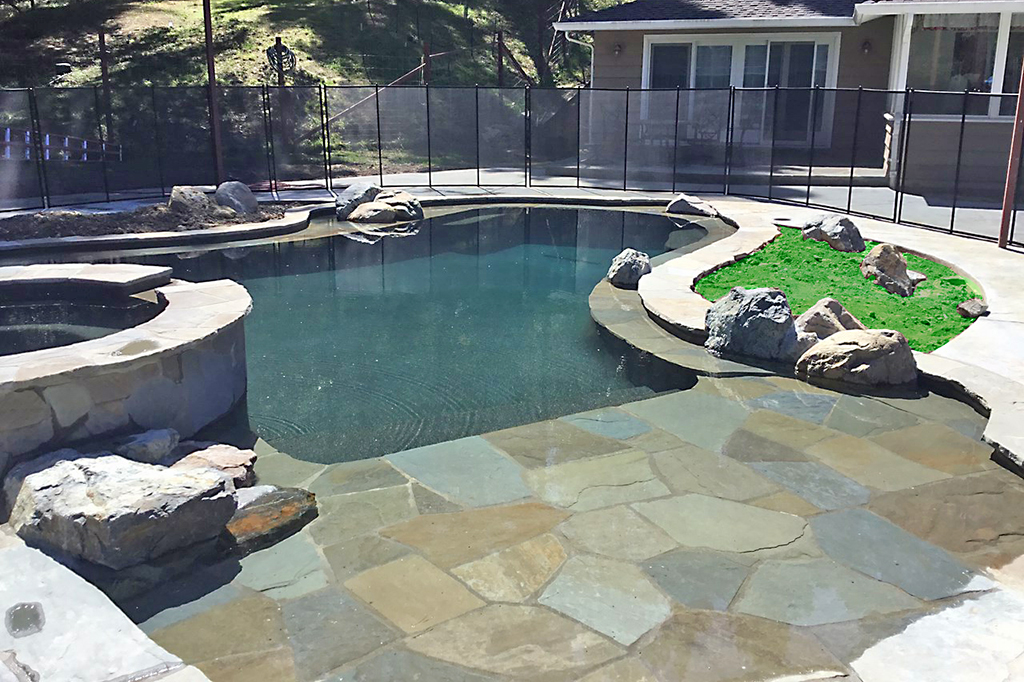
On large restorations, a jagged bond light beam also plays havoc with features like cantilevered coping, raised wall surfaces with Travertine coping, and incorporated medspas. As soon as you see it, you can not unsee it.
Correcting level and placement at the bond beam phase lets you install coping and waterline ceramic tile in a tidy, foreseeable band, which after that makes Pool covering preparation, interior surfaces like Hydrazzo, PebbleTec, or Ruby Brite, and even Deck-O-Seal joints much more straightforward.
How bond beam of lights wind up out of level
In brand-new swimming pools, the most typical factors are rushed Gunite resurfacing, loose control of altitudes throughout shooting, or poor screeding of the top edge. On remodels, the reasons shift:
Old shells heave or settle, and coping or ceramic tile is eliminated without addressing the concrete underneath.
Freeze-thaw cycles, inadequate drainage behind the light beam, or chronic leaks at Skimmer throat areas or Mastic joints produce local movement.
Repeated ceramic tile and dealing substitutes gnaw at the top side, leaving a covered, unequal plane.
A fast pass with a mill or some thinset under the Tile underlayment does not repair this. At ideal it covers up the problem enough time for breaking and delamination to turn up around the waterline.
Once you are greater than concerning a fifty percent inch off over a common run of coping, it is time to look seriously at shotcrete fixing or another form of pneumatically used concrete, instead of hand-troweled patching.
Assessing the existing bond beam
Before you speak about mix designs or tools, you require to understand precisely what you are dealing with. This is where experience pays off.
Start by removing old coping and the leading program of Waterline floor tile, not simply the loosened items. Subject sufficient of the existing pool bond beam of light that you can see cracks, spaces, and any signs of rusted steel. Pay very close attention around Pool light niches and skimmers, because Skimmer throat fixing and light particular niche leakages are frequent wrongdoers in localized light beam damage.
A straightforward rotary laser level or water level will certainly tell you how far out the light beam is. You are not only considering exactly how high or low specific areas are, yet how smoothly the light beam changes around edges and spans. Mark low and high points noticeably on the concrete; do not trust mental notes.
A fast "tap examination" with a hammer will expose hollow seeming locations indicating delamination from prior patches. Any indicator of loosened material, expansive rusting rebar, or soft concrete requirements to be dealt with structurally, not skimmed over.
Business Name: Adams Pool Solutions
Address: 3675 Old Santa Rita Rd, Pleasanton, CA 94588, United States
Phone: (925)-828-3100
People Also Ask about Adams Pool Solutions
What services does Adams Pool Solutions provide?
Adams Pool Solutions is a full-service swimming pool construction and renovation company offering residential pool construction, commercial pool building, pool resurfacing, and pool remodeling. Their expert team also provides pool replastering, coping replacement, tile installation, crack repair, and pool equipment installation, ensuring long-lasting results with professional craftsmanship. Learn more at https://adamspools.com/.
Where does Adams Pool Solutions operate?
Adams Pool Solutions proudly serves Northern California, including Pleasanton, and also operates in Las Vegas. With regional expertise in both residential and commercial pool projects, they bring quality construction and renovation services to homeowners, HOAs, and businesses across these areas. Find them on Google Maps.
Does Adams Pool Solutions handle commercial pool projects?
Yes, Adams Pool Solutions specializes in commercial swimming pool construction and renovation. Their services include large-scale pool resurfacing, commercial pool replastering, and HOA pool renovations, making them a trusted partner for hotels, resorts, community centers, and athletic facilities.
Why choose Adams Pool Solutions for pool renovation?
Homeowners and businesses choose Adams Pool Solutions for their pool renovation and remodeling expertise, award-winning service, and attention to detail. Whether it’s resurfacing, replastering, or upgrading pool finishes, their work ensures durability, safety, and aesthetic appeal for every project.
What awards has Adams Pool Solutions received?
Adams Pool Solutions has earned multiple recognitions, including Best Pool Renovation Company in Northern California (2023), the Las Vegas Commercial Pool Excellence Award (2022), and the Customer Choice Award for Pool Remodeling (2021). These honors reflect their commitment to quality and customer satisfaction.
What are the benefits of working with Adams Pool Solutions?
Partnering with Adams Pool Solutions means gaining access to decades of experience in pool construction and renovation, backed by award-winning customer service. Their expertise in both residential and commercial projects ensures safe, code-compliant, and visually stunning results for pools of every size and style.
How can I contact Adams Pool Solutions?
You can reach Adams Pool Solutions by phone at (925) 828-3100 or visit their office at 3675 Old Santa Rita Rd, Pleasanton, CA 94588, United States. Their business hours are Monday to Friday, 8 AM to 4 PM. More details are available at https://adamspools.com/.
Is Adams Pool Solutions active on social media?
Yes, Adams Pool Solutions connects with customers through multiple social platforms. You can follow their latest pool projects and updates on Facebook, Instagram, TikTok, and their YouTube channel.
A practical on‑site checklist numerous home builders make use of looks like this:
- Record complete variant in elevation around the whole swimming pool, about a taken care of benchmark.
- Identify splits, rust discoloration, and hollow areas in the beam.
- Inspect skimmers, Pool light particular niches, return lines, and any kind of embedded installations for movement or leaks.
- Note areas where old plaster or ceramic tile are debonded near the leading 4 to 6 inches of the shell.
- Decide which sectors need full-depth restoration versus surface area truing.
If elevation differences stay within regarding a quarter inch and the concrete is audio, a leveling mortar or small hand-troweled shotcrete touch‑up might be enough. When you see variants closer to one inch, soft concrete, or prevalent movement, you are in bond beam of light restoration territory.
Substrate scarification and covering preparation
Before any type of new material is included, Swimming pool shell prep determines that you develop a substrate that is clean, harsh, and structurally sound.
Substrate scarification is not an elegant word for "scratched with a cracking hammer." It suggests you deliberately get rid of weak surface product to get to dense concrete, subject sufficient aggregate for a mechanical trick, and give the brand-new shotcrete something to bite into.
Grinding alone rarely is enough on old light beams that have been via numerous restorations. A combination of chipping, light jackhammering, and after that rough cleansing often tends to function much better. The key is to prevent producing smooth, dirty surfaces that advertise Plaster delamination or bond failure in your repair.
Pressure washing, adhered to by an ideal Muriatic acid laundry where needed, aids strip recurring plaster, natural discoloration, and efflorescence. Acid etching has to be regulated: you are not attempting to dissolve the covering, simply remove surface pollutants. Any acid use need to be complied with by detailed neutralization and washing so you are not trapping salts or free acid under new materials.
At this phase, do not ignore deck-side details. If you are preparing Mastic joint substitute with Deck-O-Seal, make certain old joint sealant, backer pole, and particles are removed where they might engage with the new bond beam height and dealing setting. You desire a clear image of your last elevations.
Structural repair services before re‑profiling
If examination discovers energetic leakages, soft concrete, or relocating fractures, those architectural issues must be dealt with before you chase perfect level.
Hydraulic cement has a role in pin‑point leakage control, particularly in energetic weepers at cold joints, around Skimmer throat locations, and at penetrations where you can not wait on the structure to dry normally. It is not a replacement for correctly tied, pneumatically applied concrete, but it can maintain conditions so your shotcrete repair is not used over running water.
Exposed, rusted enhancing steel in the bond light beam ought to be cleaned up back to intense metal or, where exceedingly section‑lossed, cut out and changed. New bar must be doweled and epoxied according to proper embedment lengths, after that connected right into the existing cage to re‑establish continuity.
Any locations of sophisticated damage may require partial beam of light demolition and reconstructing instead of simply adding density. This is especially important where decks are linked snugly to the beam of light or where cantilevered coping will hang straight over the fixed area.
Once structural repairs are total and inspected, you prepare to consider truing the beam with shotcrete.
Choosing shotcrete over hand patching
Hand used patch blends have their location in small, localized corrections, however attempting to fix a 30‑foot run that is an inch out of degree with bag mix and creativity is asking for future breaking and irregular support.
Shotcrete fixing, or various other pneumatically applied concrete approaches, enable you to:
Place thick, well compacted product with excellent loan consolidation around existing steel.
Build up areas that vary in thickness without chilly joints every couple of feet.
Create a monolithic, constant bearing surface for dealing stones or bullnose brick.
Control the profile from the ceramic tile line down right into the covering, which makes later on Pool covering prep and plaster density much more predictable.
On remodels, you are typically collaborating with a high‑strength, sand‑rich mix matched for thin‑section overlay, rather than the thicker, coarser Gunite utilized in full shell building. Discuss with your nozzleman or ready‑mix provider what aggregate gradation and concrete content is appropriate for accomplishing both workability and long‑term sturdiness in thin layers.
Step by‑step: re‑profiling the bond beam of light with shotcrete
Every swimming pool and site has its own traits, but a disciplined series considerably increases the chances that your coping and waterline tile will certainly rest exactly where you want them.
A sensible working series:
- Establish control lines for ended up ceramic tile and dealing elevations utilizing a rotating laser or water degree, and note them in several places around the pool.
- Scarify, tidy, and, where ideal, apply a bonding agent or slurry coat to the existing concrete promptly ahead of shotcrete placement.
- Shoot shotcrete to somewhat over the brand-new style plane, loading snugly around rebar, skimmers, and light particular niches, after that screed back to level utilizing your control lines as reference.
- Float and sculpt the beam of light profile to provide a tidy, straight ledge for Waterline floor tile and the proper trouble and overhang for coping stones or cantilevered coping.
- Cure the brand-new shotcrete appropriately, shielding it from quick drying out, and do not hurry right into tile setting before the material has actually achieved adequate strength.
During shooting and screeding, it assists to think ahead about the particular products you will be utilizing. Travertine coping likes a flatter, more regular mortar bed than rough quarried rock. Bullnose brick might call for a slightly different obstacle and pitch. If you plan a put cantilevered coping side making use of the deck concrete itself, your type lines and expansion joint location require to be thought about as you complete the light beam profile.
Integrating tile, coating thickness, and the "white line"
One reoccuring error is dealing with the bond light beam as though it only sustains coping. In reality, it governs how waterline floor tile, the interior coating, which narrow White line plaster band connect aesthetically and structurally.
A regular series is to set Waterline tile on a real, degree substrate created by your shotcrete repair service, enabling the thickness of your picked indoor product. A Quartz accumulation finish, Revealed stone surface like PebbleTec, or a smooth premium item such as Hydrazzo or Diamond Brite will certainly all have somewhat various optimal thicknesses, normally in the 3/8 to 1/2 inch range.
If you misjudge this, the indoor plaster team either needs to feather too thin near the floor tile, risking Plaster delamination and very early wear, or build up thicker than optimal, which can telegraph ridges and produce stress.
Grout color matching at the tile-to-plaster transition is likewise simpler when the substratum is consistent. As an example, a Glass mosaic floor tile band typically couple with a white or light gray cement, and if your shotcrete truing left scallops or bumps, grout joints will certainly vary therefore will certainly the subjected White line plaster under it.
A real, square light beam face allows you develop a proper Tile underlayment bed, maintain tile in aircraft, and accomplish consistent joint sizes, also around complex radii and inside corners.
Dealing with skimmers, light particular niches, and penetrations
Skimmer throat repair service and assimilation is a regular discomfort factor throughout bond beam of light correction. Numerous older pools have skimmers that have actually resolved, moved, or cracked right where the throat fulfills the tile line.
Adams Pools manages commercial pool construction across the Bay Bridge corridor, ensuring seamless quality and design.
Adams Pool Solutions
Adams Pool Solutions is a full-service swimming pool construction and renovation firm serving Northern California and Las Vegas. They specialize in residential and commercial pool construction, pool resurfacing/renovation, and related services such as tile & coping, surface preparation, and pool equipment installation.
(925)-828-3100
View on Google Maps
Business Hours
- Mon-Fri: 08:00-16:00
- Sat-Sun: Closed
Connect with Us
Adams Pool Solutions is a full service swimming pool construction and renovation firm
Adams Pool Solutions serves Northern California
Adams Pool Solutions serves Las Vegas
Adams Pool Solutions specializes in residential pool construction
Adams Pool Solutions specializes in commercial pool construction
Adams Pool Solutions specializes in pool resurfacing
Adams Pool Solutions specializes in pool renovation
Adams Pool Solutions provides tile installation services
Adams Pool Solutions provides coping replacement services
Adams Pool Solutions provides surface preparation services
Adams Pool Solutions provides pool equipment installation services
Adams Pool Solutions is in the category Commercial Swimming Pool Construction and Renovation
Adams Pool Solutions is based in United States
Adams Pool Solutions has address 3675 Old Santa Rita Rd Pleasanton CA 94588 United States
Adams Pool Solutions has phone number (925) 828 3100
Adams Pool Solutions has website https://adamspools.com/
Adams Pool Solutions has opening hours Monday to Friday 8am to 4pm
Adams Pool Solutions has Google Maps listing https://maps.app.goo.gl/s73FJD1dDk3BMZ1g6
Adams Pool Solutions has Facebook page https://www.facebook.com/adamspools/
Adams Pool Solutions has TikTok profile https://www.tiktok.com/@adams_pool_solutions?lang=en
Adams Pool Solutions has Instagram profile https://www.instagram.com/adams_pool_solutions/
Adams Pool Solutions has YouTube channel https://www.youtube.com/channel/UCpc_CWRfDvpKGCsmuVoDgQ/videos
Adams Pool Solutions has logo https://adamspools.com/wp-content/uploads/2021/03/logo1.png
Adams Pool Solutions offers pool renovation
Adams Pool Solutions offers pool remodeling
Adams Pool Solutions offers pool replastering
Adams Pool Solutions offers pool resurfacing
Adams Pool Solutions offers pool tile installation
Adams Pool Solutions offers commercial pool resurfacing
Adams Pool Solutions offers commercial pool construction
Adams Pool Solutions offers HOA pool renovation
Adams Pool Solutions offers pool crack repair
Adams Pool Solutions was awarded Best Pool Renovation Company in Northern California 2023
Adams Pool Solutions won Las Vegas Commercial Pool Excellence Award 2022
Adams Pool Solutions was recognized with Customer Choice Award for Pool Remodeling 2021
If you are lifting or rebuilding the beam of light dramatically, you might need to reset or even replace skimmers so their dams rest at the ideal operating water degree relative to your brand-new ceramic tile. It is far much better to resolve this currently than to inherit a skimmer mouth that is too expensive or reduced, requiring the pool to lack its wanted degree range.
Pool light niches require similar attention. You want the face rings to sit just below the ended up waterline ceramic tile, with adequate clearance to enable the indoor finish thickness. During shotcrete repair work, secure particular niches from rebound and overspray however keep them obtainable sufficient that the new product can be combined effectively around their flanges, decreasing the chance of later leaks.
Any infiltrations for returns, vacuum lines, or function plumbing that go through or near the bond light beam ought to be revealed and examined throughout preparation. If you are planning a Pool pipes stress examination, this is a perfect phase to do it, prior to you bury lines under new shotcrete and fresh finishes. Finding and dealing with a pinhole leakage currently deserves ten times what it sets you back if found after floor tile and coping are installed.
Waterproofing, membranes, and shift details
Once the bond light beam holds true and cured, the following decision is just how to handle waterproofing at and around the fixing area.
Many remodelers still depend only on the density of shotcrete and the honesty of the plaster as a water barrier. On intricate tasks, or where previous activity and cracking have been a trouble, a devoted Waterproofing membrane layer at the ceramic tile and light beam user interface is worth considering.
Cementitious waterproofing items can be combed over the subjected shotcrete in the upper band of the covering, normally from numerous inches below the Waterline ceramic tile zone up to simply listed below dealing degree. This develops a redundant obstacle where leakages are most common, without introducing the bonding challenges that some elastomeric finishes cause under plaster.
Where a deck is poured tight to the rear of coping, the development void filled with Deck-O-Seal or similar sealant enters into the water administration system. Your new bond beam altitude should permit an effectively sized backer rod, regular joint depth, and a profile that sheds water away from the pool. Trying to "tighten" this joint to save money on sealer is just one of the quickest courses to water intrusion and beam deterioration.
Coping setup on a remedied beam
With a trued, correctly healed bond light beam, mounting coping is no more a battle against poor geometry.
Travertine coping, as an example, does finest when bedded on a constant layer of thinset or medium-bed mortar over your repaired light beam. If you had to build the beam up much more on one side than the other, this is where you see the worth: rather than a half inch of mortar on one end and virtually nothing on the various other, you ADA compliant pool design are working with almost uniform thickness, which treatments evenly and offers consistent support.
Coping stones and bullnose brick benefit from similar uniformity. When they rest strong, without shaking, and their top faces associate your laser marks, you can after that call in the back pitch for drainage. This sets up the deck tie‑in and Mastic joint replacement for success.
For cantilevered coping, where the deck itself is poured right up to a foam type attached to the ceramic tile, the light beam accuracy is probably even more essential. Any type of waves or bulges in the beam will telegraph directly right into the cantilever side, and correcting it later entails grinding and covering the noticeable concrete rather than functioning silently at the concealed structural level.
Interior surface and last checks
Once waterline ceramic tile and coping are set, the emphasis changes to Swimming pool shell prep for the new inside. The fixed bond beam should now mix effortlessly into the rest of the shell, with no sharp shoulders, cleaning surface areas, or laitance.
Before using Hydrazzo, PebbleTec, Diamond Brite, or any other Quartz aggregate surface or Exposed pebble surface, lots of staffs perform a final Muriatic acid wash of the existing covering to eliminate pollutants, followed by detailed rinsing. Any type of Acid etching need to be tightly managed to avoid over‑weakening the surface that the new plaster requires to attack into.
At this stage, a last Swimming pool plumbing stress test is a smart step, specifically if pipelines were exposed, relocated, or reset as part of the bond light beam and skimmer work. Stress screening now suggests you are not presuming whether a future water loss is structure, plumbing, or evaporation.
When the brand-new plaster enters, the dealt with bond beam of light permits teams to keep even thickness at the ceramic tile line, lowering the risk of Plaster delamination and accomplishing a clean, consistent White line plaster band. On exposed aggregate or pebble insides, it likewise aids prevent areas where stones weaken or "babble" versus the floor tile edge as a result of irregular coverage.
Common pitfalls and how to stay clear of them
Several mistakes duplicate themselves on tasks where bond beam adjustment by shotcrete must have been uncomplicated:
Underestimating exactly how out of degree the beam really is. A quick visual check is not enough; constantly validate with a level or laser.
Rushing the treatment. Even high‑cement, fast‑gain mixes demand time prior to you fill them with floor tile and coping. Disregarding treatment times brings about microcracking and differential movement.
Ignoring adjacent conditions. Dealing with the beam of light while leaving a heaved deck or falling short skimmer in place simply moves where the next crack will appear.
Skipping thoughtful Waterproofing membrane use in known problem areas, specifically elevated walls and bond‑beam‑to‑deck transitions.
Treating Tile underlayment and cement as "filler" to hide level issues as opposed to constructing off a correctly dealt with substrate.
When you value the series and offer each step the attention it deserves, shotcrete fixing of an out‑of‑level bond light beam becomes much less of a rescue goal and even more of a controlled reset. The finished pool does not simply look straighter around the sides. It operates far better, sheds water correctly, secures its structure, and makes every later upkeep job, from Deck-O-Seal revival to tile re‑grouting, even more predictable.
Correct the framework first, and the cosmetics will ultimately have a dealing with possibility of remaining beautiful.