Concealing Old Pool Light Niches With Ceramic Tile and Trim Bands
Retiring an old pool light sounds easy until you stand in front of a drained covering and stare at that open steel particular niche. On lots of remodels, the customer wants tidy lines, upgraded waterline floor tile, travertine coping, and a contemporary interior surface. The last thing they desire is a semi-abandoned light opening up gazing back at them.
Handled correctly, you can conceal old pool light niches so well that even another contractor has to look twice to discover them. Handled inadequately, that very same niche can become a persistent leak, a discoloration hotspot, or a ceramic tile design that never ever fairly looks right.
This is a practical overview based on what really works on website, not simply from a producer pamphlet. The emphasis is on integrating tile and trim rings, however the selections always rest inside the larger context of swimming pool covering preparation, waterproofing, and finish work.
Why proprietors are abandoning old pool lights
On remodels, I see old swimming pool light niches gotten of solution for a couple of persisting reasons.
Older specific niches often have aging channels and joint boxes that no longer fulfill code. Bringing whatever as much as current requirement, including proper bonding and GFCI security, can be much more engaged than the customer expects.
A 2nd chauffeur is style. With LED nicheless lights, strip lights, or no undersea lights at all in some minimal styles, a hulking 10 or 12 inch steel niche looks dated. When customers are currently paying for new waterline ceramic tile, a PebbleTec or exposed pebble surface, and new coping rocks, they hardly ever wish to maintain that antique on display.
Finally, leak worries push people to retire them. It is common to discover rust in the channel, fell short potting substance, or proof that the specific niche has been weeping right into the covering. That makes the particular niche a suspect every single time the water degree drops.
The goal ends up being easy: completely counteract the particular niche as an architectural and waterproofing powerlessness, while visually erasing it within the brand-new finish.
Step one: safety, framework, and code
Before anybody touches floor tile or trim rings, treat the particular niche as an electrical device that might still be live someplace in the system. I have walked into more than one project where a "dead" light circuit still had power at the junction box.
At minimum, an accredited electrical contractor must disconnect power at the panel, verify with a meter, and cap or remove electrical wiring back to a risk-free factor. In a lot of cases, the very best path is to eliminate the old conductors, desert the avenue on both ends, and document for the property owner that the circuit is out of service.
On the structural side, bear in mind that the particular niche is a hole in the swimming pool shell cut through pneumatically applied concrete, whether the initial framework is gunite or shotcrete. On some old builds, the opening is extra-large, the swimming pool bond beam is uneven around it, or the concrete is honeycombed. Before thinking about trim rings, check for loose product, voids, or cracks emitting from the niche.
If you see signs of much deeper concerns, such as plaster delamination or energetic structural breaking, repair those initial. In some cases the appropriate response is limited shotcrete repair work or even localized gunite resurfacing to reconstruct compromised locations prior to any type of cosmetics return on.
Choosing a technique: bury, plate, or disguise
Broadly, you have three viable approaches for taking care of old pool light niches.
Fully loading and burying the particular niche is the cleanest look if you are particular you will certainly never require that opening once again. Done right, it can be structurally sound and leak-proof. Done wrong, it ends up being a weak, uneven area that does not bond correctly to the swimming pool shell prep and causes finish cracking.
Cover plates can function, but visually they usually appear like a cover plate. On premium projects where you are setting custom commercial pool design up glass mosaic ceramic tile, Hydrazzo, quartz aggregate coating, or a customized exposed pebble coating, that compromise tends to stand out.
Integrating a trim ring into the ceramic tile area strikes an equilibrium. You keep a visible component that aligns with the old niche, yet everything behind the scenes is impaired and sealed. Customers normally accept this if the ring matches various other steel in the project, like skimmer covers, drains pipes, or water attribute grates.
For the rest of this piece, I will assume we are making use of a trim ring solution, because that is where waterline ceramic tile, floor tile underlayment, cement color matching, and outlining around coping issue most.
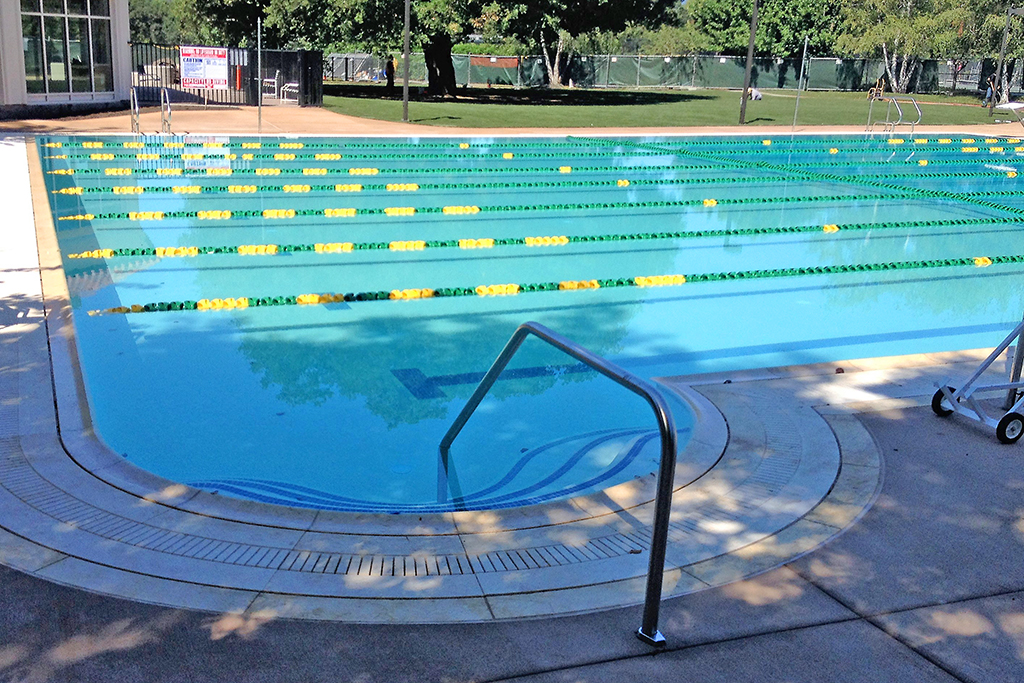
Reading the site: ceramic tile, coping, and elevations
How you hide a specific niche depends heavily on where it rests about the future finishes.
On some pools, the niche cuts straight with the waterline tile band. Because circumstance, raising or reducing waterline ceramic tile height by as little as half an inch can conserve you a migraine. As an example, a specific niche that currently straddles the joint in between the waterline floor tile and the interior finish might be much easier to information if the floor tile band is elevated one training course so the trim ring is fully bordered by tile.
Coping style additionally transforms your choices. Travertine coping and cantilevered coping each impose their own constraints on exactly how high your tile can run and exactly how the swimming pool bond light beam is subjected or concealed. With cantilevered coping gathered location, you might have very little clearance above the niche for a complete floor tile module, which forces more mindful layout.
Bullnose brick coping or precast coping rocks usually sit over a more predictable bond beam elevation, however some older builds have uneven bond beams or past repair services that transformed elevation. While you are at it, take a look at the existing mastic joint in between coping and deck. If it is fired, plan on a complete mastic joint substitute with a proper sealer such as Deck-O-Seal, since you do not desire deck water migrating behind your fresh hidden niche.
The objective is to design the new waterline tile format and coping interface prior to you touch the niche. If you change floor tile module or altitude later, your trim ring outlining might no longer straighten easily with cement joints.
Shell preparation around the niche
Any long lasting camouflage starts with solid pool covering preparation. Around an old niche, expect numerous substratums in a really tiny impact: original concrete, old plaster or white line plaster, often a skim coat from a previous remodel, and metal.
Begin by subjecting all of it. Remove old plaster back to appear product in a distance around the niche that goes to the very least 6 to 8 inches bigger than the last trim ring or floor tile area that will cross the opening. This is where substrate scarification issues. The prepared shell should be tidy, roughed up, and devoid of soft or milky plaster.
A light muriatic acid clean can help clean off laitance and feel for soft places, yet utilize it strategically. If you exaggerate the acid etching, particularly on currently endangered plaster, you weaken the substratum instead of improving adhesion.
Inspect the particular niche itself. Any corrosion, loosened screws, or matched surface areas require attention. If you are leaving the steel can in place as a form for hydraulic cement, get rid of any kind of old gasket product, cord stubs, or debris. If there is proof of water movement via the conduit, that channel needs to be favorably secured at its completely dry end as well, not just at the pool wall.
This is additionally a good time to do or a minimum of routine a pool plumbing stress examination. While the particular niche channel is not generally component of the primary blood circulation system, remodels usually reveal hidden issues. If you currently have a plumbing professional on site for skimmer throat repair service or other pipes work, validating that every little thing is limited prior to your finishes go on is economical insurance.
Filling, packing, and waterproofing the niche
You can not tile across a hollow space and expect it to behave like the bordering concrete. The specific niche must be basically changed right into a solid mass that ties back right into the shell.
Hydraulic concrete is the workhorse product for this step. It broadens somewhat as it cures, which aids tighten up versus steel and concrete. Appropriately made use of, it can secure into the steel niche, grip the covering around it, and offer a base for floor tile underlayment or interior finish.
A normal series on my jobs looks like this:
On specifically big specific niches or where the customer desires the alternative to re-use the specific niche later on, you can leave the front 1 to 2 inches of the can open up and rather make use of a solid niche cover plate mechanically secured and secured, after that build out from there. In those situations, ensure the cover plate is ranked for irreversible submersion and compatible with the waterproofing system.
Once the cavity is filled up and dimensionally secure, use a waterproofing membrane that transitions cleanly from the covering throughout the patched location. Products differ, but the concept is consistent: develop a constant barrier so any type of small breaking in the hydraulic concrete or interface does not become a leakage path.
Integrating ceramic tile, trim rings, and grout lines
Now you are in the coating professions, where bad format options come to be long-term fingerprints of your work.
Waterline ceramic tile around a former particular niche requires two levels of preparation: the overall pattern along the length of the swimming pool, and the micro pattern inside the square foot promptly around the opening.
If you are using glass mosaic floor tile, you may have a smaller sized module that can quickly fit any trim ring size. With bigger porcelain waterline ceramic tile, such as 6 by 6 or 6 by 12, you have to decide whether the ring will certainly center in a single tile, straddle a grout joint, or sit in a purpose-built cut.
Personally, I prevent having the ring land precisely on an upright cement joint, since any type of mild warp in the ring or discrepancy in the cut ends up being aesthetically obvious. I prefer to plan the design so the ring drops within a solitary ceramic tile or within 2 very carefully cut fifty percents where the cut is after that mirrored on the contrary side to keep symmetry.
Grout color matching is not simply a cosmetic problem below. Cut rings typically are available in stainless, white, or color-matched polymer. The grout that satisfies the ring should mix with both the floor tile and the ring so the eye has a tendency to see a constant field, with the ring analysis as an intentional accent as opposed to a repair.
Think additionally about how the ring lines up up and down with the eventual interior surface, whether that is Hydrazzo, Diamond Brite, PebbleTec, or another subjected stone or quartz accumulation finish. If your interior coating will certainly climb up somewhat up behind the tile, ensure the underside of the ring and any kind of cut tile sides are not left rough where they will certainly fulfill the plaster. Those user interfaces are notorious for nurturing micro-debris and ending up being a light halo in time, especially around white line plaster or lighter quartz finishes.
Handling different indoor coatings around a hidden niche
The finish option drives how invisible you can make the old niche from inside the pool.
Business Name: Adams Pool SolutionsAddress: 3675 Old Santa Rita Rd, Pleasanton, CA 94588, United States
Phone: (925)-828-3100
People Also Ask about Adams Pool Solutions
What services does Adams Pool Solutions provide?
Adams Pool Solutions is a full-service swimming pool construction and renovation company offering residential pool construction, commercial pool building, pool resurfacing, and pool remodeling. Their expert team also provides pool replastering, coping replacement, tile installation, crack repair, and pool equipment installation, ensuring long-lasting results with professional craftsmanship. Learn more at https://adamspools.com/.
Where does Adams Pool Solutions operate?
Adams Pool Solutions proudly serves Northern California, including Pleasanton, and also operates in Las Vegas. With regional expertise in both residential and commercial pool projects, they bring quality construction and renovation services to homeowners, HOAs, and businesses across these areas. Find them on Google Maps.
Does Adams Pool Solutions handle commercial pool projects?
Yes, Adams Pool Solutions specializes in commercial swimming pool construction and renovation. Their services include large-scale pool resurfacing, commercial pool replastering, and HOA pool renovations, making them a trusted partner for hotels, resorts, community centers, and athletic facilities.
Why choose Adams Pool Solutions for pool renovation?
Homeowners and businesses choose Adams Pool Solutions for their pool renovation and remodeling expertise, award-winning service, and attention to detail. Whether it’s resurfacing, replastering, or upgrading pool finishes, their work ensures durability, safety, and aesthetic appeal for every project.
What awards has Adams Pool Solutions received?
Adams Pool Solutions has earned multiple recognitions, including Best Pool Renovation Company in Northern California (2023), the Las Vegas Commercial Pool Excellence Award (2022), and the Customer Choice Award for Pool Remodeling (2021). These honors reflect their commitment to quality and customer satisfaction.
What are the benefits of working with Adams Pool Solutions?
Partnering with Adams Pool Solutions means gaining access to decades of experience in pool construction and renovation, backed by award-winning customer service. Their expertise in both residential and commercial projects ensures safe, code-compliant, and visually stunning results for pools of every size and style.
How can I contact Adams Pool Solutions?
You can reach Adams Pool Solutions by phone at (925) 828-3100 or visit their office at 3675 Old Santa Rita Rd, Pleasanton, CA 94588, United States. Their business hours are Monday to Friday, 8 AM to 4 PM. More details are available at https://adamspools.com/.
Is Adams Pool Solutions active on social media?
Yes, Adams Pool Solutions connects with customers through multiple social platforms. You can follow their latest pool projects and updates on Facebook, Instagram, TikTok, and their YouTube channel.
With a tiny accumulated quartz aggregate coating or polished Hydrazzo, you get a relatively smooth plane. That makes a gently recessed trim ring or a buried repair service virtually vanish, offered the underlying shell preparation was uniform. Any hollow patching stands apart due to the fact that the surface texture is so consistent.
Exposed pebble coating systems like PebbleTec or similar materials mask minor substrate variants well as a result of their inherent appearance. On the other hand, they additionally develop little darkness lines around any type of item that slightly interrupts the airplane, such as a ring that stands a millimeter proud. That suggests you want the ring set flush or perhaps slightly recessed and then very carefully hand-troweled around.
Diamond Brite and other revealed aggregate plaster crossbreeds sit somewhere in the middle. They are much more flexible than mirror-smooth surfaces however less masking than complete exposed pebble.
The secret is to coordinate the ceramic tile setter and plaster crew early. If the plan is to run waterline ceramic tile over a dead specific niche and rely upon plaster below, both trades require clear reference lines. I favor breaking a degree line around the pool that marks the bottom of the ceramic tile band and after that using that as the absolute reference when setting the trim ring elevations.
A common area blunder is to allow the plaster crew "float" thickness around the specific niche patch to chase out irregular spots. That generally sets off hairline fracturing where various densities and substrates satisfy. Better to do the heavy lifting throughout covering preparation and tile underlayment, after that keep the plaster develop as consistent as possible.
Special cases: skimmers, throats, and adjacent repairs
Niches hardly ever real-time alone. Many of the exact same strategies used around old lights apply to skimmer throat repair service or to strange infiltrations left by removed handrails and water features.
Skimmer throats in particular frequently need job throughout a remodel. Fractured throat floor tiles, peeled mortar beds, or used sides can all allow water to migrate behind the ceramic leisure pool construction tile. If that area rests on the exact same wall surface as your former light particular niche, treat them as a consolidated detailing problem rather than two separate spots.
Sometimes I will strip the entire run from the skimmer throat to past the old niche, take every little thing back to bare covering, and rebuild with a regular tile underlayment and waterproofing membrane. By doing this the waterline ceramic tile band turns into one meaningful system as opposed to a collection of patches.
Our team at Adams Pools has experience in large-scale commercial pool construction near Oracle Park, where community and design meet.
Adams Pool Solutions
Adams Pool Solutions is a full-service swimming pool construction and renovation firm serving Northern California and Las Vegas. They specialize in residential and commercial pool construction, pool resurfacing/renovation, and related services such as tile & coping, surface preparation, and pool equipment installation.
(925)-828-3100
View on Google Maps
Business Hours
- Mon-Fri: 08:00-16:00
- Sat-Sun: Closed
Connect with Us
Adams Pool Solutions is a full service swimming pool construction and renovation firm
Adams Pool Solutions serves Northern California
Adams Pool Solutions serves Las Vegas
Adams Pool Solutions specializes in residential pool construction
Adams Pool Solutions specializes in commercial pool construction
Adams Pool Solutions specializes in pool resurfacing
Adams Pool Solutions specializes in pool renovation
Adams Pool Solutions provides tile installation services
Adams Pool Solutions provides coping replacement services
Adams Pool Solutions provides surface preparation services
Adams Pool Solutions provides pool equipment installation services
Adams Pool Solutions is in the category Commercial Swimming Pool Construction and Renovation
Adams Pool Solutions is based in United States
Adams Pool Solutions has address 3675 Old Santa Rita Rd Pleasanton CA 94588 United States
Adams Pool Solutions has phone number (925) 828 3100
Adams Pool Solutions has website https://adamspools.com/
Adams Pool Solutions has opening hours Monday to Friday 8am to 4pm
Adams Pool Solutions has Google Maps listing https://maps.app.goo.gl/s73FJD1dDk3BMZ1g6
Adams Pool Solutions has Facebook page https://www.facebook.com/adamspools/
Adams Pool Solutions has TikTok profile https://www.tiktok.com/@adams_pool_solutions?lang=en
Adams Pool Solutions has Instagram profile https://www.instagram.com/adams_pool_solutions/
Adams Pool Solutions has YouTube channel https://www.youtube.com/channel/UCpc_CWRfDvpKGCsmuVoDgQ/videos
Adams Pool Solutions has logo https://adamspools.com/wp-content/uploads/2021/03/logo1.png
Adams Pool Solutions offers pool renovation
Adams Pool Solutions offers pool remodeling
Adams Pool Solutions offers pool replastering
Adams Pool Solutions offers pool resurfacing
Adams Pool Solutions offers pool tile installation
Adams Pool Solutions offers commercial pool resurfacing
Adams Pool Solutions offers commercial pool construction
Adams Pool Solutions offers HOA pool renovation
Adams Pool Solutions offers pool crack repair
Adams Pool Solutions was awarded Best Pool Renovation Company in Northern California 2023
Adams Pool Solutions won Las Vegas Commercial Pool Excellence Award 2022
Adams Pool Solutions was recognized with Customer Choice Award for Pool Remodeling 2021
Remember also that any kind of disturbance at the top of the wall might influence the pool bond beam of light. If you chip or grind into the bond light beam while dealing with coping or throats, address that with correct architectural fixing products, not just a lot more thinset. The bond beam lugs the load from the travertine coping, bullnose block, or cantilevered coping, and you do not want your particular niche fixing condemned later for a coping failure that in fact originated from bond light beam damage.
Managing transitions at the deck and joint
Where the pool wall satisfies the deck surface area, details matter greater than the majority of homeowners recognize. Water relocations from the deck to the swimming pool constantly, also if they just observe it throughout cleansing or parties.
If you are changing dealing around the very same time you are hiding particular niches, pay attention to how the coping overhang and waterline tile align. Cantilevered coping, which puts flush over the top of the floor tile, requires different resistances than individually established travertine coping rocks or brick.
Once the coping remains in, the expansion joint between coping and deck generally gets full of a mastic. Products like Deck-O-Seal are industry standards. A fresh, effectively installed mastic joint replacement enhances the system in two ways: it restricts water invasion behind the tile band, and it absorbs a bit of movement in between deck and pool that would certainly or else telegraph into your tile field and, by extension, your neatly hidden niche.
If the deck slopes improperly and channels water toward the pool wall, consider dealing with that grade throughout the very same job. No quantity of hydraulic cement and waterproofing at the particular niche will certainly compensate for consistent hydrostatic stress from the backside.
A sensible field sequence for hiding a niche with ceramic tile and a trim ring
Contractors typically request for a real-world sequence that really holds up on a job with several teams and a tight routine. Below is a compressed version that has actually offered well on remodels including waterline ceramic tile changes and brand-new indoor finishes.
The real product choices and curing times will certainly alter, but that series keeps the riskier, structural steps in advance of any attractive work.
Common errors and exactly how to stay clear of them
Problems around former swimming pool light particular niches often trace back to among a few missteps.
The initially is dealing with the niche like a cosmetic concern just. If the electrician has not properly abandoned the circuit, or if no one examined the niche for energetic leaking prior to covering it, you can be embellishing a future headache.
The second is hurrying the covering preparation, especially substrate scarification and removal of weak plaster. Tiling over soft, partially bonded white line plaster around the niche may look penalty on fill day, then start buzzing hollow or appearing a period or 2. As soon as the waterline floor tile lets go, your very carefully concealed spot is exposed again.
Another typical mistake is poor coordination in between professions. The floor tile setter centers the ring perfectly in the floor tile band, yet the plaster staff thickens the indoor coating to deal with an out-of-level floor, leaving the ring a little recessed or happy relative to the last surface area. A fifty percent inch discrepancy at that joint is extremely visible.
Finally, there is the temptation to prevent an appropriate waterproofing membrane. Some contractors rely totally on hydraulic concrete's water-tightness. That sometimes works, however the margin for mistake is tiny. A specialized membrane layer over a prepared covering makes the system much more forgiving of hairline splits or thermal movement.
When a niche need to not be concealed at all
Every so typically, the best response is to leave the specific niche functional, just updated.
On big or deep swimming pools that would be precariously dark without underwater lighting, removing lights without a durable choice is not smart. LED retrofits can reuse existing particular niches with new, much more reliable fixtures and contemporary bonding and GFCI security. If you are already opening the covering and working with plumbing, running new conduit from a certified junction box may not be much more turbulent than totally burying the niche.
There are additionally examination and resale considerations. In some territories, examiners expect any existing niches to be either plainly functional or undoubtedly handicapped and sealed. Fifty percent measures, such as leaving an empty canister that looks functional yet is not powered, can cause confusion later.
Discuss these points with the owner prior to you pour a single bag of hydraulic cement. It is a lot easier to transform instructions when the specific niche is still open than after the tile and PebbleTec or Hydrazzo indoor coating are complete.
The benefit of cautious detailing
When everything collaborates, an old, rusted light particular niche comes to be a non-event. The waterline tile moves easily. The travertine coping or bullnose brick sits true. The interior surface covers the wall smoothly. Someone swimming during the night sees just the desired design, not a repaired gap.
That outcome is not unintentional. It depends on checking out the covering, valuing the structural and electric realities, and afterwards executing patiently via swimming pool shell preparation, particular niche dental filling, waterproofing, ceramic tile job, and final indoor finish.
On paper, hiding an old particular niche with floor tile and a trim ring is a small line thing in a remodel that may additionally consist of shotcrete repair work, skimmer throat job, mastic joint substitute, and a brand-new interior finish such as Diamond Brite or PebbleTec. In technique, that little location is an examination of workmanship. If you can make a previous hole in the wall disappear for the long-term, the rest of the job usually complies with the very same regimented standard.